

How this page has changed
July 26, 2026
Sources, internal links and safety or product context reviewed.
In this guide
- 01Quick answer by strap type
- 02Before attaching the strap
- 03Method 1: use a dedicated yoga mat carry sling
- 04Method 2: turn a D-ring yoga strap into a carrier
- 05Method 3: use plain webbing without hardware
- 06Where the loops should sit
- 07How tight should the loops be?
- 08Test before carrying
- 09Troubleshooting
- 10Carry strap versus bag
- 11Care and storage
- 12Final checklist
To use a yoga mat strap, make or open two adjustable loops, slide one over each end of an evenly rolled mat, move both loops inward, and cinch them snugly. The middle section becomes the handle or shoulder sling. Test the attachment just above the floor before walking with it.
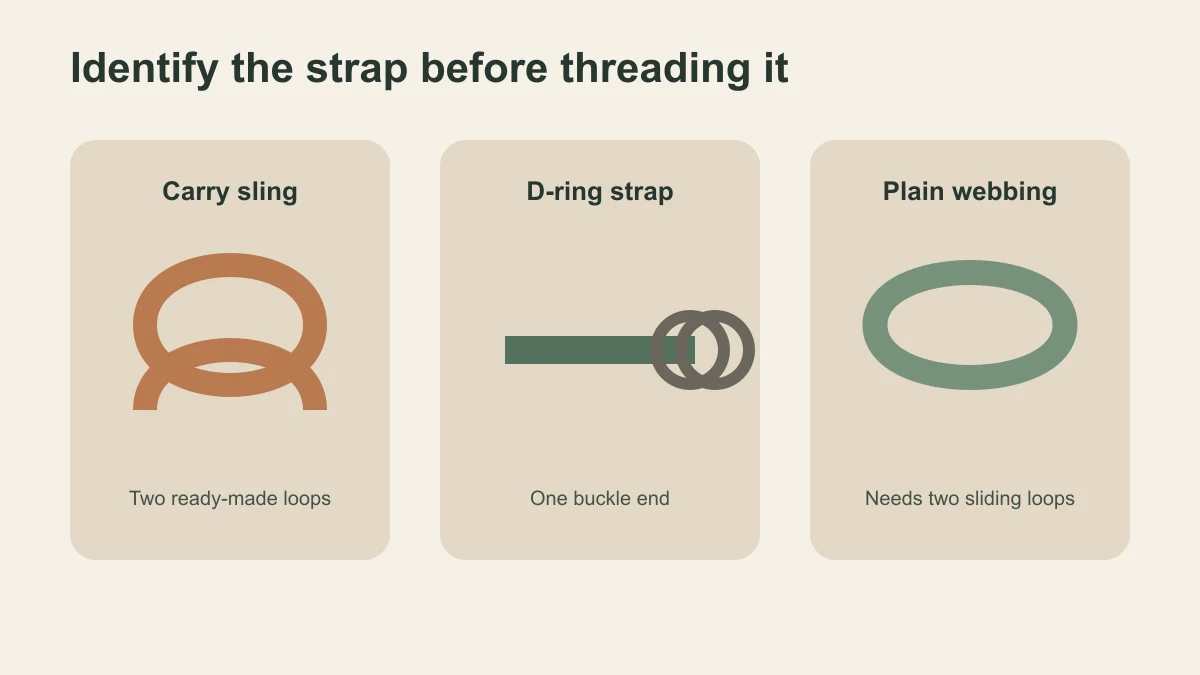
The exact threading depends on what you own. A dedicated mat carrier already has two loops. A D-ring practice strap has one locking buckle and needs a second loop. Plain webbing needs two sliding loops. This guide shows all three without turning the page into pose instruction.
Both belong on this single URL.
Quick answer by strap type
| Strap in your hand | What to do | Best clue |
|---|---|---|
| Dedicated carry sling | Open the two end loops, slide them over the roll and cinch | Two adjustable loops already exist |
| D-ring practice strap | Lock one loop through the rings; make a sliding second loop from the tail | One end has two metal rings |
| Cinch-buckle strap | Follow the buckle path printed or molded on the product | One adjustable plastic or metal cam |
| Plain non-elastic webbing | Tie a sliding loop at each end, leaving the middle as a handle | No hardware at either end |
| Elastic mat band | Use only to keep a roll closed, not as a shoulder carrier | Short, stretchy loop with no handle section |
Do not improvise with a damaged strap, loose bungee cord or thin elastic. A carrier must hold the mat when its weight loads both loops.
Before attaching the strap
Use a dry, evenly rolled mat
Roll the mat into a straight cylinder, keeping both side edges aligned. If one edge advances faster, the roll becomes a cone and its narrow end can pass through an otherwise tight loop. Reroll instead of compensating by crushing the strap tighter.
The mat should be fully dry. A strap can press moisture into the rolled layers, and carrying or storing a damp roll encourages odor and material damage. The storage guide covers model-specific rolling direction and drying.
Inspect load-bearing parts
Check the complete length of the webbing, both loops, buckle or D-rings, and every stitched joint. Stop if you find a torn edge, separated seam, cracked buckle, distorted ring or webbing that slips through a locked buckle under gentle hand tension.
A strap dropping a mat is mostly an equipment problem, but it can also damage the mat or whatever is below it. Test close to an empty floor—not above feet, a bicycle wheel, stairs or traffic.
Method 1: use a dedicated yoga mat carry sling
This is the simplest design. It has a sliding loop at each end and a fixed or adjustable section between them.
- Lay the strap flat and remove twists.
- Enlarge both end loops enough to pass over the rolled mat.
- Slide one loop over each end.
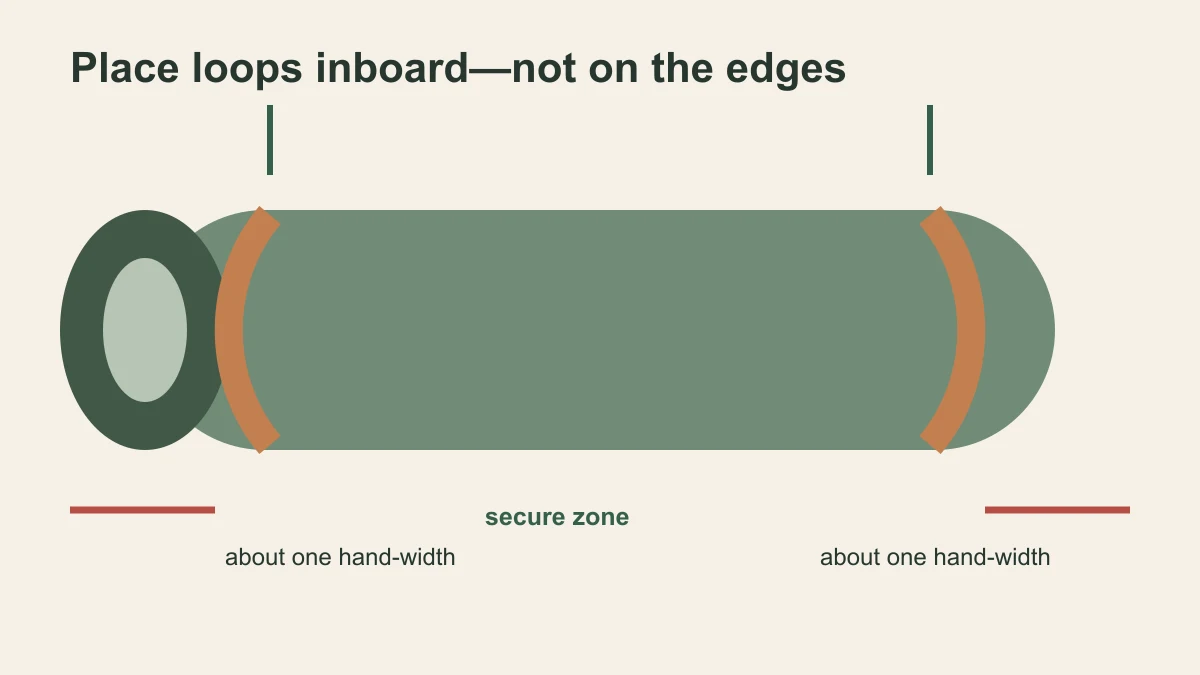
- Move each loop roughly one hand-width inward from its edge.
- Pull the designated cinch sections until both loops are snug.
- Lift the roll a few inches and watch both loops.
- Adjust the middle section only after the test succeeds.
“Snug” means the loop cannot migrate toward the end under a small lift. It does not mean compressing the mat until its edge buckles. Very soft foam may need wider loops or a cradle-style carrier that spreads pressure.
Method 2: turn a D-ring yoga strap into a carrier
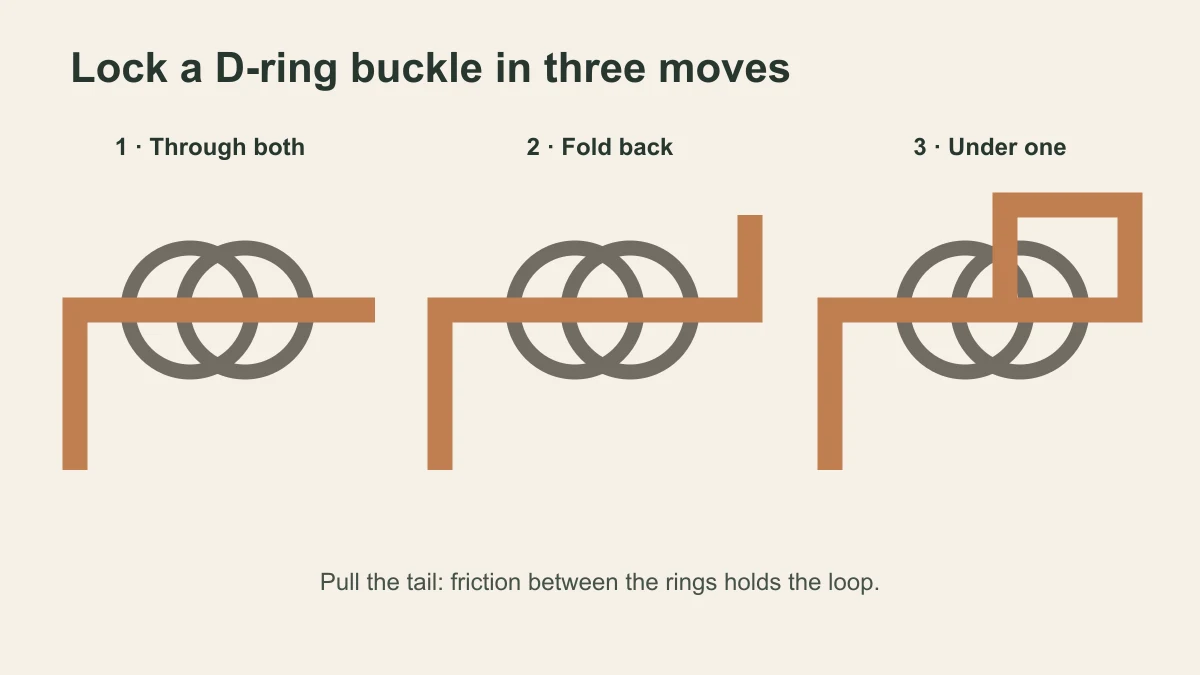
A D-ring strap normally has two rings fixed at one end and a free tail at the other. The buckle locks because the tail reverses direction between the rings.
Lock the first loop
- Pass the free tail through both rings.
- Separate the rings slightly.
- Fold the tail back over the ring it crossed last.
- Feed it underneath the other ring.
- Pull the tail to make a large adjustable loop.
If the tail runs straight through both rings without coming back between them, it is not locked. The buckle may look assembled while sliding freely as soon as the mat loads it.
Form the second loop
Slide the locked D-ring loop over one end of the rolled mat. With the remaining long tail, form a second sliding loop around the other end while retaining enough webbing between them to carry the roll.
Strap designs and lengths differ. Some convertible products use a sewn loop that the tail passes through; others require a manufacturer-specified slip loop. If the product has a diagram, use it. Do not tie a permanent tight knot that cannot be released or that loads directly against the mat edge.
If the remaining tail cannot create a complete second loop and a comfortable middle section, the strap is too short for that mat diameter. Use a dedicated carrier rather than a marginal knot.
Method 3: use plain webbing without hardware
Plain, non-elastic webbing can carry a mat when it is long enough and you can form two stable sliding loops. A common arrangement is one adjustable slip loop at each end with an untouched shoulder section in the middle.
- Find the center and mark it temporarily with a fold.
- In each outer section, form a sliding loop whose loaded part tightens around the mat.
- Keep both knots outside the contact area so hard knots do not press into the surface.
- Put one loop around each end and position them inward.
- Pull-test each loop separately by hand.
- Test the complete assembly close to the floor.
Knot behavior depends on webbing stiffness, width and surface finish. A knot that holds in soft cotton may creep in slick synthetic tape. If either loop changes size under a gentle stationary test, do not carry the mat with it.
This is a transport use only. It does not establish that a homemade carrier is suitable as an exercise prop or for supporting body weight.
Where the loops should sit
Put each loop far enough inward that it cannot roll over the edge, but not so close to the center that the mat sags or telescopes. About one hand-width from each end is a practical starting point; adjust for mat length, roll diameter and strap width.
Keep the setup symmetrical. If one loop sits near an edge and the other near the center, the shoulder section pulls at an angle and the roll can walk sideways. Both loops should load together when the mat hangs horizontally.
For an unusually heavy mat, compare its published weight in our yoga mat weight guide. A narrow strap that is mechanically secure may still be uncomfortable. A wider sling or padded yoga mat bag distributes the load better.
How tight should the loops be?
Tighten until you cannot slide the loop toward the end with light hand pressure. Then stop. Over-tightening can leave temporary compression marks in soft foam, distort a rolled edge or stress a coated surface.
The correct tension also changes with diameter. A thick 10mm mat creates a much larger roll than a 1.5mm travel mat. Recheck both loops whenever you switch mats rather than assuming the previous setting is secure.
Do not leave a tight carrier cinched around a stored mat for months unless the manufacturer recommends it. A carry strap is not automatically the best long-term storage method.
Test before carrying
Use a two-stage test:
- Hold the middle section with both hands and lift the mat only two or three inches above a clear floor.
- Hold for several seconds, lower it, and check whether either loop migrated, loosened or twisted.
If it stays stable, adjust the carrying length. Keep the roll close to the body and make sure it does not obstruct your view or swing into other people. For cycling, running, stairs or crowded transit, a dedicated bag or securely designed carrier is more appropriate than an improvised knot.
Troubleshooting
The mat slides out through one end
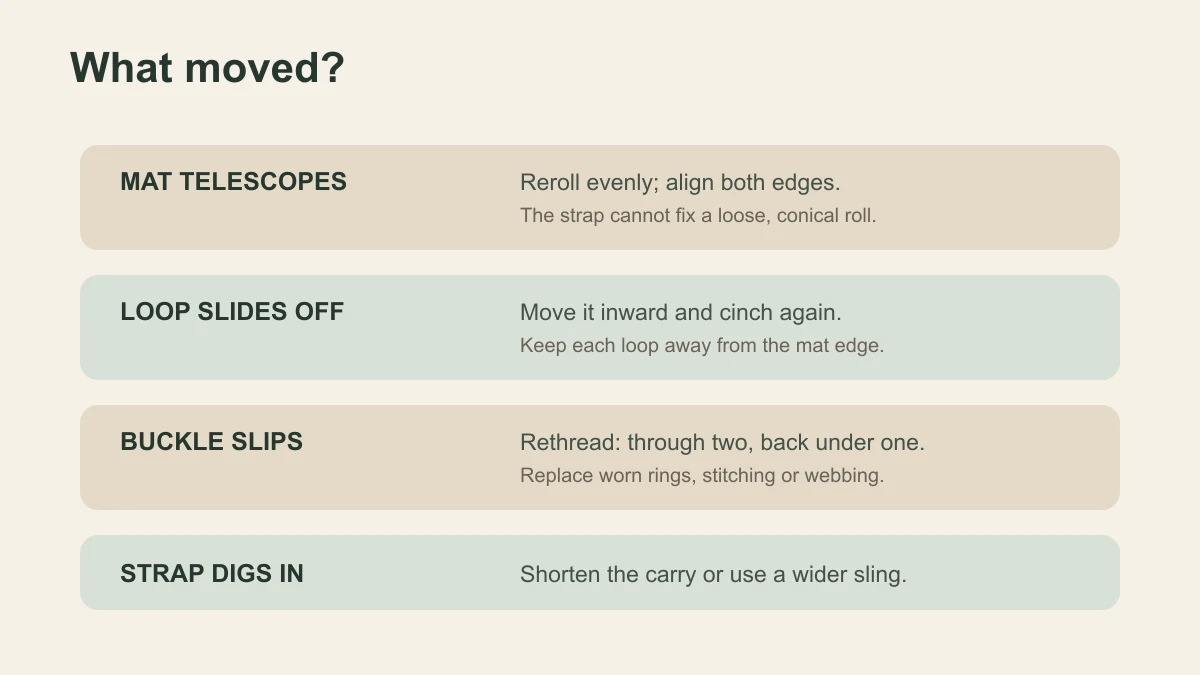
Reroll it. A telescoping or cone-shaped cylinder becomes narrower at one end, so the loop loses purchase. Align the edges and position both loops equally far inward.
A loop falls off the edge
Move it inward and cinch again. Check that the loaded section tightens the loop rather than opening it. If the loop still expands, its knot or buckle path is wrong for the direction of load.
The D-ring buckle loosens
Confirm the tail went through both rings, folded back, then passed under only one. Dirty, polished or damaged webbing can still creep even when threaded correctly; replace the strap if a hand pull changes the setting.
The rolled mat hangs diagonally
Make the two loop positions symmetrical and center the shoulder section. Also check whether the mat roll itself is wider at one end.
The strap digs into your shoulder
Shorten it so the mat rides closer to the body, reduce what you carry, or move to a wider padded sling. A thin practice strap can be secure and still be a poor carrier for a heavy mat.
The strap marks the mat
Release excess tension. Clean grit from both strap and mat, because trapped particles can abrade a coating. For delicate PU, printed or cork surfaces, follow the manufacturer’s carrying advice and consider an open cradle that does not use narrow cinch points.
Carry strap versus bag
| Choose a strap when | Choose a bag when |
|---|---|
| You carry only the mat | You also carry a towel, keys or clothing |
| The route is short and dry | You need weather or dirt protection |
| Minimum weight matters | A wider padded shoulder section matters |
| The mat’s roll diameter varies | You want everything enclosed |
| Fast attachment matters | Crowded commuting needs better containment |
A strap is the minimal answer; a bag is the protective answer. Neither changes the mat’s performance. If the mat stays at home, you may need neither.
Care and storage
Let a damp strap dry separately from the mat. Follow its label for washing: cotton webbing, synthetic webbing, metal hardware and padded sections do not necessarily share one method. Close buckles or contain metal rings so they do not strike a washing-machine drum if machine washing is explicitly allowed.
Store the strap loose rather than leaving deep cinch pressure on the mat. Before the next trip, inspect high-friction areas near rings, buckles, knots and stitched loop ends.
Final checklist
- Roll the mat dry, straight and even.
- Identify whether you have two loops, D-rings, a cam buckle or plain webbing.
- Use the hardware’s intended threading path.
- Position both loops inward and symmetrically.
- Cinch snugly without crushing the roll.
- Inspect webbing, hardware and stitching.
- Test only a few inches above a clear floor.
- Reroll a telescoping mat instead of overtightening it.
- Use a wider sling or bag when mat weight makes a thin strap uncomfortable.
Once the two loops load evenly, the strap has one simple job: keep a straight roll together while the middle section carries it.
Frequently asked questions
How do you use a yoga mat strap?
Roll the dry mat evenly, place one adjustable loop around each end, move the loops about one hand-width inward, and cinch them snugly. Test the carrier close to the floor before putting the middle section over your shoulder.
How do you tie a yoga mat strap with D-rings?
Feed the loose tail through both rings, fold it back over the first ring, then pass it under the second ring. Pulling the tail locks the webbing between the rings. Use that adjustable loop on one end of the mat and form a second secure loop from the remaining tail.
Why does my yoga mat slip out of its strap?
The usual causes are a cone-shaped roll, loops placed directly on the edges, loose cinches or incorrectly threaded D-rings. Reroll the mat evenly, move both loops inward and check the hardware before carrying it again.
Can any yoga strap carry a mat?
Only if it is long enough to form two secure loops plus a usable middle carry section, and its webbing, rings and stitching are intact. Short stretch straps, elastic bands and damaged practice straps are not suitable substitutes.
Is a mat strap the same as a yoga practice strap?
Not always. A dedicated mat sling has two loops for transport. A practice strap commonly has one D-ring or buckle and may be convertible into a carrier when it is long enough. Follow the product instructions if it is sold for both uses.